Find deals and compare prices on arduino gps module at Amazon.com. Browse & discover thousands of brands. Read customer reviews & find best sellers No matter what you love, you'll find it here. Search gps modul arduino and more. Looking for gps modul arduino? We have almost everything on eBay.

Arduino GPS Tutorial How to Use a GPS Module with Arduino
Wire the NEO-6M GPS module to the Arduino UNO Get raw GPS data Parse raw data to obtain selected and readable GPS information Get location Introducing the NEO-6M GPS Module The NEO-6M GPS module is shown in the figure below. It comes with an external antenna, and does't come with header pins. So, you'll need to get and solder some. In this tutorial, we are going to learn how to get GPS coordinates (longitude, latitude, altitude), GPS speed (km/h), and date time from NEO-6M GPS module. We also learn how to calculate the distance from current GPS position to a predefined GPS coordinates (ex. coordinates of London) Hardware Required Or you can buy the following sensor kit: 1 × 1. Connect the antenna to the GPS unit. 2. Solder header pins as needed to the GPS module. 3. Connect the USB-TTL cable to your computer. 4. Connect the power and ground from the cable to the power and ground of your USB module. 5. Connect the TTL Rx cable to the GPS Tx and the TTL Tx to the GPS Rx. These GPS modules are compatible with Arduino and Raspberry Pi, making it easy for you to start trying it out. Today's guide will cover: Things to consider before purchasing a GPS module Features of: NEO-6M, Grove - GPS Module and Grove - GPS (Air530) Ublox NEO-6M GPS Module vs Grove - GPS Module vs Grove - GPS (Air530) Commuity GPS project
Satellite Positioning GPS Module For Arduino 51MCU STM32 Electronic Pro
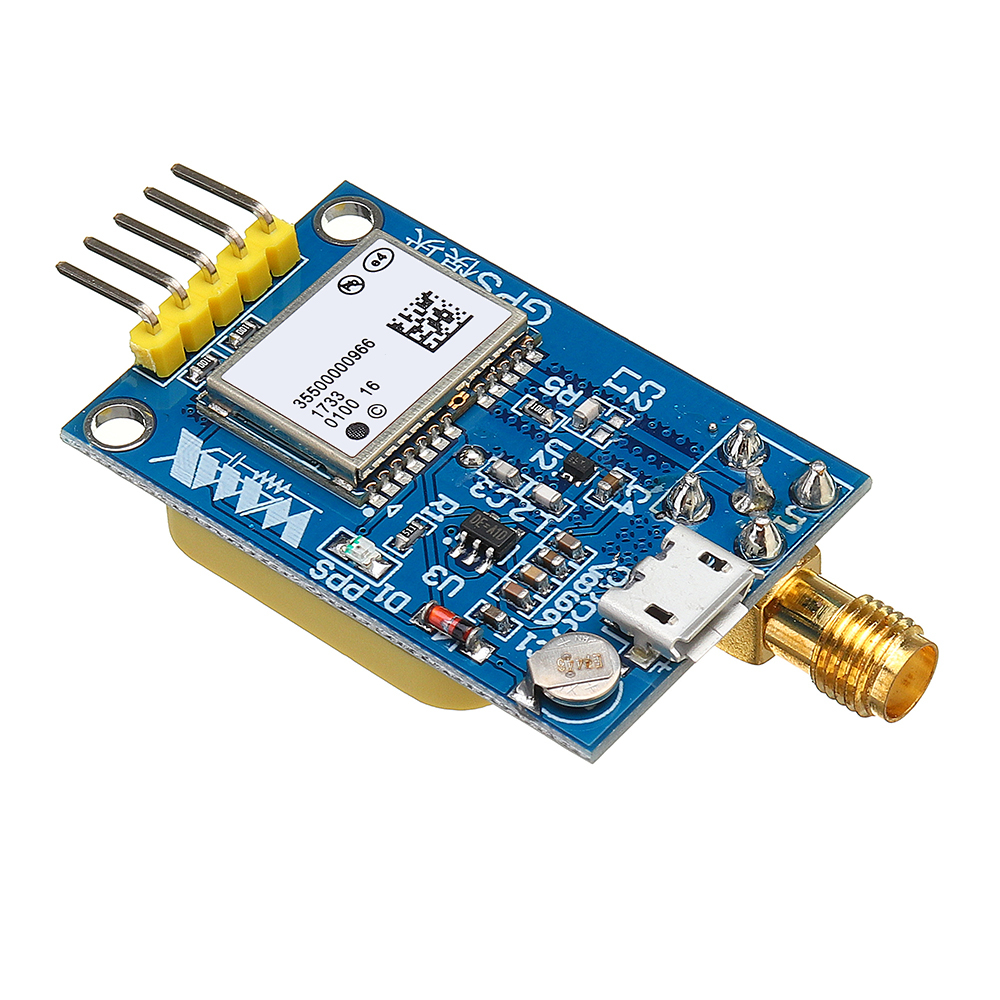
The NEO-6M GPS module is a GPS receiver that can locate all locations on Earth as it is able to track approximately 22 satellites. It consists of a high-performance u-blox 6 positioning engine. Measuring 16 x 12.2 x 2.4 mm, its compact architecture along with its low power consumption makes it a good choice for IoT projects. This tutorial will build an Arduino GPS module project using the Neo-6M module from u-Blox. I have provided you with a full step-by-step guide, connection diagrams, and Arduino example code to build a project where you can also track the position and speed of any object. Step 1: Circuit Step 2: Code NEO-8M GPS Module Features The GY-NEO-8M module is an advanced GPS module based on uBlox m8N that supports UART communication protocol with active antenna. You can interface this module easily with a microcontroller. NEO-6M GPS Module Pinout. The NEO-6M GPS module has a total of 4 pins that connect it to the outside world. The connections are as follows: GND is the ground pin and needs to be connected to the GND pin on the Arduino. TxD (Transmitter) pin is used for serial communication. RxD (Receiver) pin is used for serial communication.

How to use GPS with arduino GPS NEO 6M tutorial
2. Once you have a compatible GPS receiver, connect it to a 5V power from the Arduino and a ground pin. Connect the RX and TX pins on the GPS to serial pins on the Arduino. 3. Use the Arduino's serial monitor to make sure the GPS is outputting data. Be aware that many GPS modules have long "cold start" times, so be patient and give it a. GPS Module Tutorial | GPS NEO 6M/7M/8M. Let's explore, how to interface NEO-6M GPS Module with Arduino Uno. GPS Module supports serial communication. We'll r.
NEO-6M GPS module with Arduino. The neo6m GPS module typically has four main pins -VCC, GND, TX and RX. The below image shows the neo6mv2 GPS module pinout. VCC: Connects to a 5V power supply. GND: Ground connection. TX: Transmit pin (outputs data), connects to the RX pin of the Arduino or another device (receiver). This is a simple Instructable for the people who'd like to know how to connect and use their GPS module with an Arduino. I am using an Arduino Duemilanove and an EM-406A GPS module. NOTE: The breadboard is not necessary but makes the job a lot easier. Ask Question Comment Step 1: Customizing the GPS
How to Interface GPS Module (NEO6m) with Arduino Arduino Project Hub
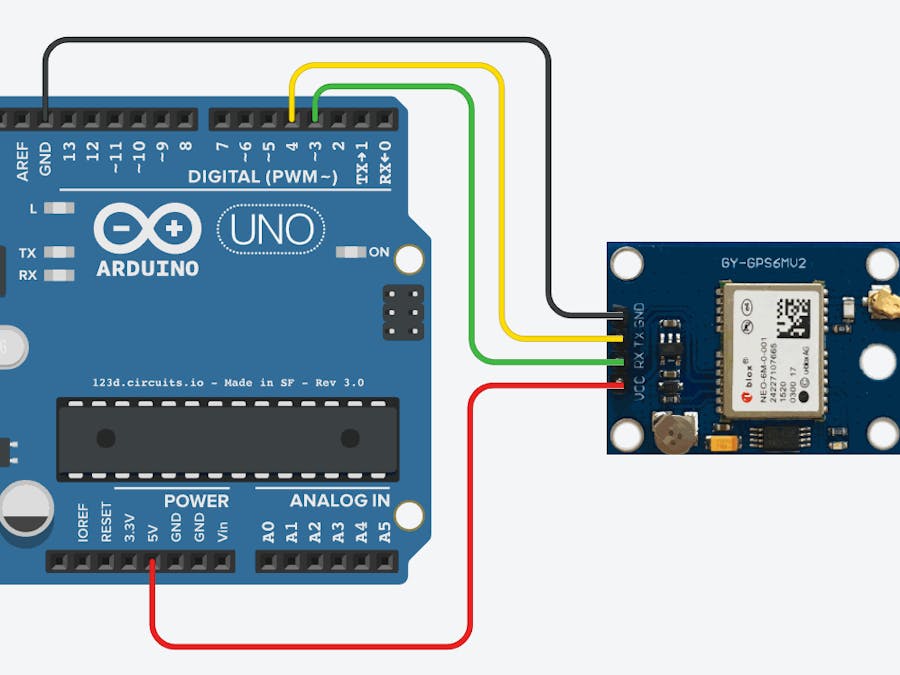
The heart of the module is a NEO-6M GPS chip from u-blox. It can track up to 22 satellites on 50 channels and achieves the industry's highest level of sensitivity i.e. -161 dB tracking, while consuming only 45mA supply current. The u-blox 6 positioning engine also boasts a Time-To-First-Fix (TTFF) of under 1 second. Step 3: Interface GPS Module With Arduino Uno. Connect Vcc of GPS module to Power Supply Pin (5V) of Arduino Uno. Connect Rx (Receiver Pin) of GPS module to D3 Pin of Uno. Connect Tx (Transmitter Pin) of GPS module to D4 Pin of Uno. Connect GND (Ground Pin) of GPS module to GND of Uno.
