Installieren, Grundeinrichtung und fertig ist Ihre WordPress Website! (PDF-Handbuch). Einfache Schritt für Schritt Anleitung zur fertigen WordPress Website. die Werbeagentur mit professionellen Lösungen im Bereich Webdesign und Programmierung. individuelle CMS Lösungen, Web- & Grafikdesign, professionelles Webdesign
Facebook Pixel in WordPress einbinden YouTube
This plugin will install a Meta Pixel for your page so you can capture the actions people take when they interact with your page, such as Lead, ViewContent, AddToCart, InitiateCheckout and Purchase events. It also includes support for the Conversions API. Select "Web" and click the "Connect" button. Select "Web" and click the "Connect" button Provide a name for your pixel and click the "Create Pixel" button. Give a name to your Facebook Pixel Congratulations! You've created a new Facebook Pixel. The next step is to add it to your WordPress website using a plugin or manually. After that, you need to add your Facebook Conversion API Token to set up eCommerce tracking. To do that, go back to the 'Data Sources' screen from the Facebook Events Manager and click on your pixel. With your pixel selected, click on the 'Settings' tab, and then click on the 'Generate Access Token' link. After clicking the link. Click the pencil icon to edit. Click the + block inserter and search for the Custom HTML block. Click to add it to the site. Paste the modified pixel code in the Custom HTML block. Click the Save button. Once added, it can take up to 20 minutes for the Meta Pixel status to get updated on the Facebook dashboard.

für WordPress Facebook Pixel erstellen und einbinden YouTube
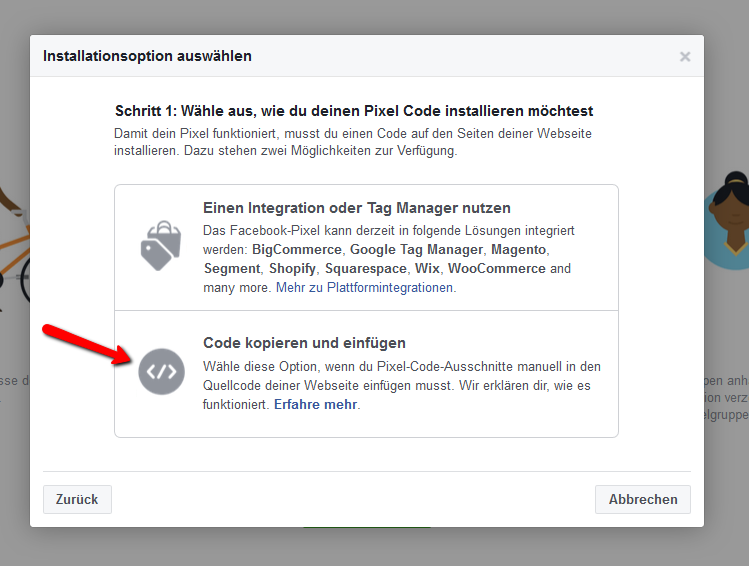
How to Add a Facebook Pixel to WordPress: Step-by-Step Guide Are you looking to add a Facebook Pixel to your WordPress website, but don't know how? Don't worry, you're not alone! In this guide, we will walk you through the steps of How to Add a Facebook Pixel to WordPress quickly and easily. To manually add Facebook Pixel to WordPress, you have to complete two steps: Create a new Facebook Pixel at the Facebook website ( if you haven't already) Insert the tracking code from that Facebook Pixel into the section of your WordPress site It's nothing too complicated - I promise! Let's get started… There are 2 steps to set up a pixel: Create your pixel and set up the pixel base code on your website. You can use a partner integration if one is available to you or you can manually add code to your website. Set up events on your website to measure the actions you care about, like making a purchase. They don't need to manage Facebook pixel settings in their own respective plugins. This allows website marketers to create campaigns targeted to further down funnel people. We use WordPress as an example, while the other two platforms (Drupal and Joomla) use similar logic. The samples for each are provided in the open-sourced Github: Wordpress.
How to Install the Facebook Pixel in WordPress? A Detailed Guide
To add Facebook Pixel to WordPress site, follow these steps: Log in to your WordPress dashboard. Install and activate a suitable Facebook Pixel plugin (e.g., "Pixel Cat"). Navigate to the plugin settings and paste the Pixel code snippet in the designated field. Install the Meta Pixel yourself or with the help of a developer. If you have access to your website's code, you can add the Meta Pixel yourself by placing the Meta Pixel base code on all pages of your website. For full step-by-step instructions, visit the Help Center. If you need more help, you can enlist the help of a developer to set up the.
Facebook pixel allows you to track how people interact with your website to optimize your content and advertising for maximum results. I'll show you how to add facebook pixel to WordPress in this article. There are two ways to do it. One is adding facebook pixel to WordPress manual, and another is using a WordPress plugin. Step 2: Create Your Pixel. Now, go ahead and click Web, then the blue Connect button: Then, name your pixel whatever you'd like and click the Create Pixel button: In the next step, you'll be asked to input your website's URL. Go ahead and do that and click Check:
Teil 1 Wie du den Facebook Pixel in WordPress einbaust Jakob Hager
Click Continue and then allow Pixel Caffeine to manage your ads, access your ads, and so on. Once you have granted permission, you will be redirected to your WordPress blog, and you will see the Facebook Pixel plugin configuration page. From the dropdown, choose the Ad account and Pixel ID. Then, click Apply. Step 1: Create Your Facebook Pixel. To get started, you'll need to create your Facebook Pixel via Facebook's interface. Each Facebook Ads account can only have one pixel, so you'll just reuse this same pixel across all your sites. To create your Pixel, go to the Pixels tab in Facebook Events Manager ( this link will take you straight there ).
