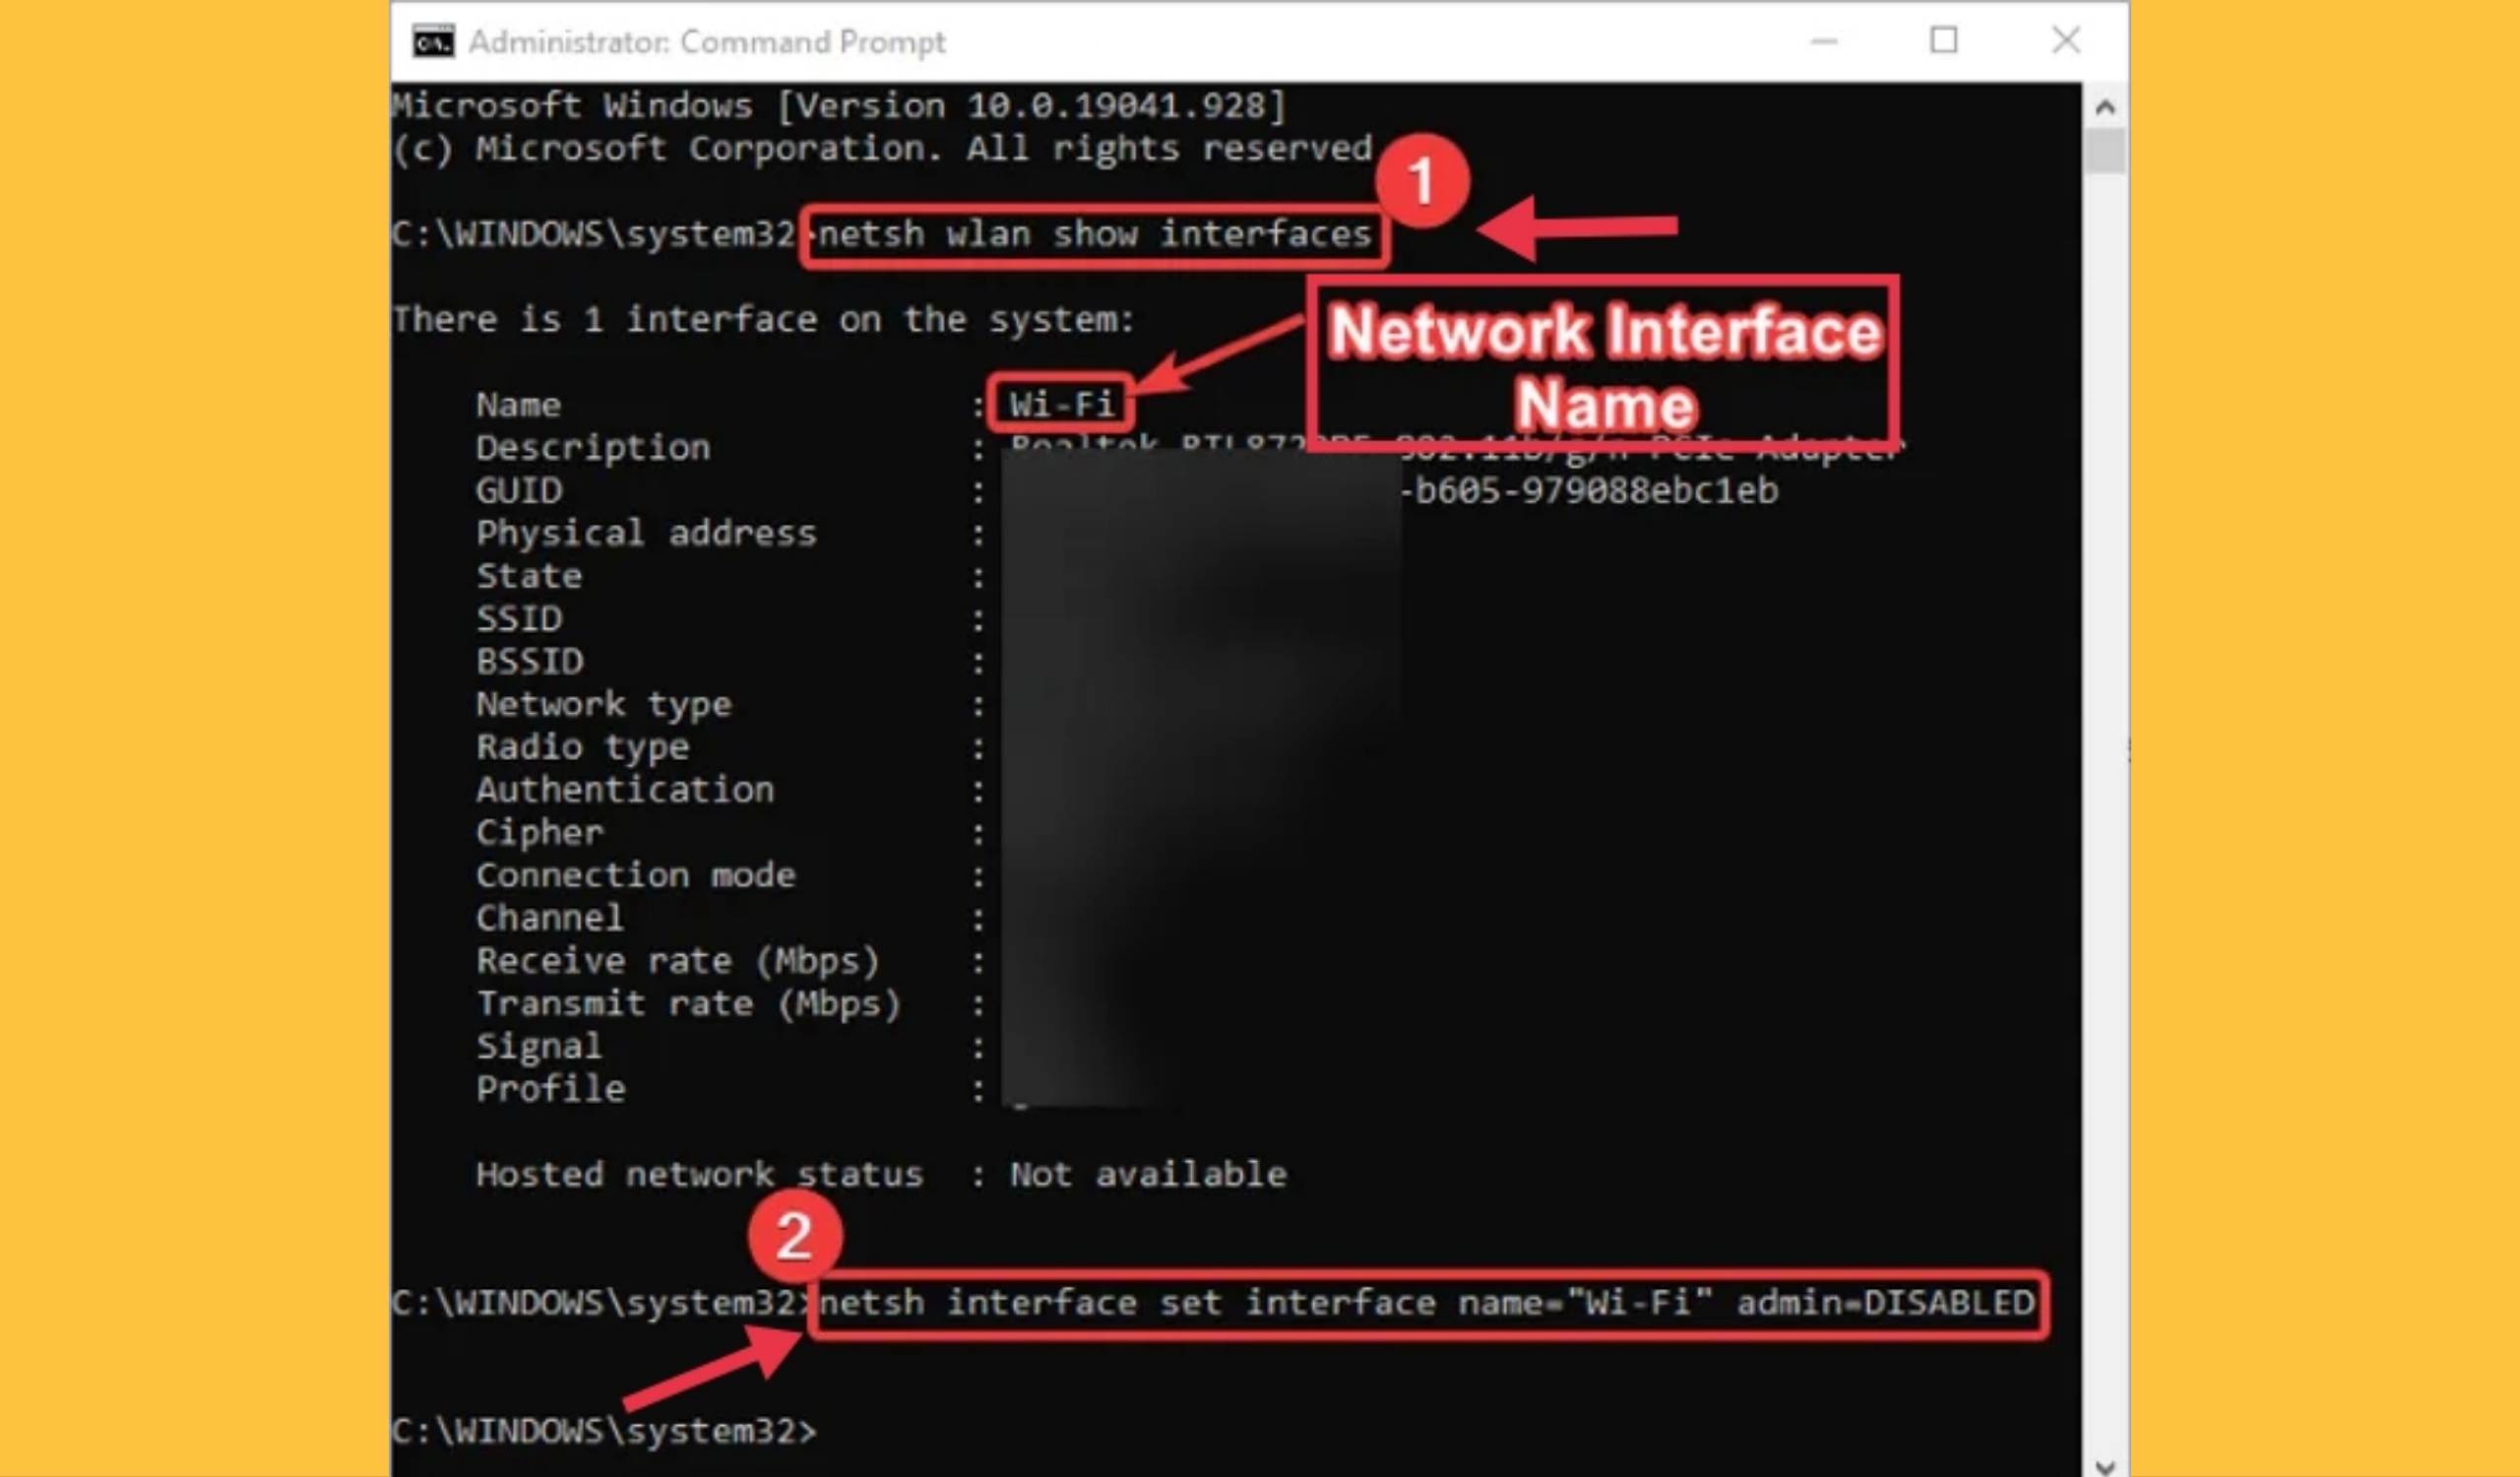
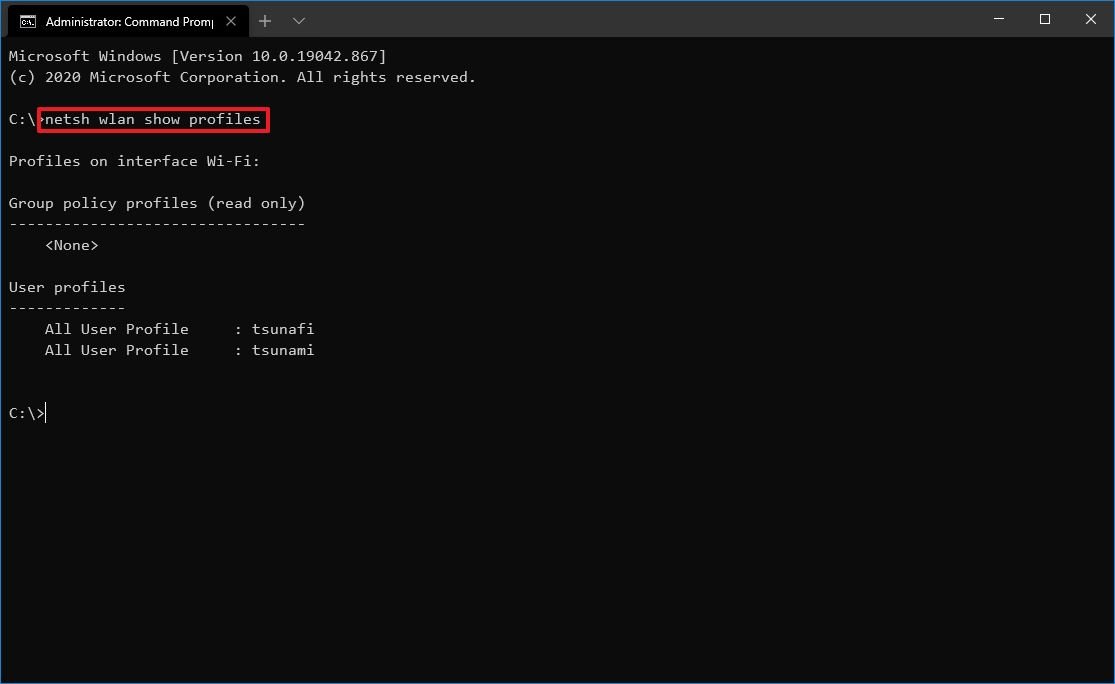
Open Start. Search for Command Prompt, right-click the top result, and select the Run as administrator option. Type the following command to view the wireless network profiles saved on your. Step1: Press start and type CMD, right-click on the Command Prompt option shown as a search result and click on Run as administrator. Step 2: Type the following command and press Enter to show a list of network names that we connect to. netsh wlan show profile
How to Disable WiFi in Windows 10 Using CMD or Powershell
1. Ping "Ping" is one of the most basic yet useful network commands to utilize in the command prompt application. It tells you whether your computer can reach some destination IP address or domain name, and if it can, how long it takes data to travel there and back again. Sample usage and output: Open Start. Search for Command Prompt, right-click the top result, and select the Run as administrator option. Type the following command to view the Wi-Fi network profiles stored on your. Open the command prompt by opening Run (Windows + R) and typing CMD. Hit Enter. Note: Alternatively, you can use Search and type CMD. Right-click on Command Prompt and select Run As Administrator. Type the following command line and hit Enter: NETSH WLAN SHOW PROFILE You will see a list of WLAN profiles stored on the PC. 2 Answers Sorted by: 4 Unfortunately if you want to connect to a wireless network from command prompt that requires a passcode it won't happen. First of all to connect to a wireless network with a password you need to setup a profile or you need to have an already set up profile you can check that profile by using
How to manage wireless networks with Command Prompt on Windows 10
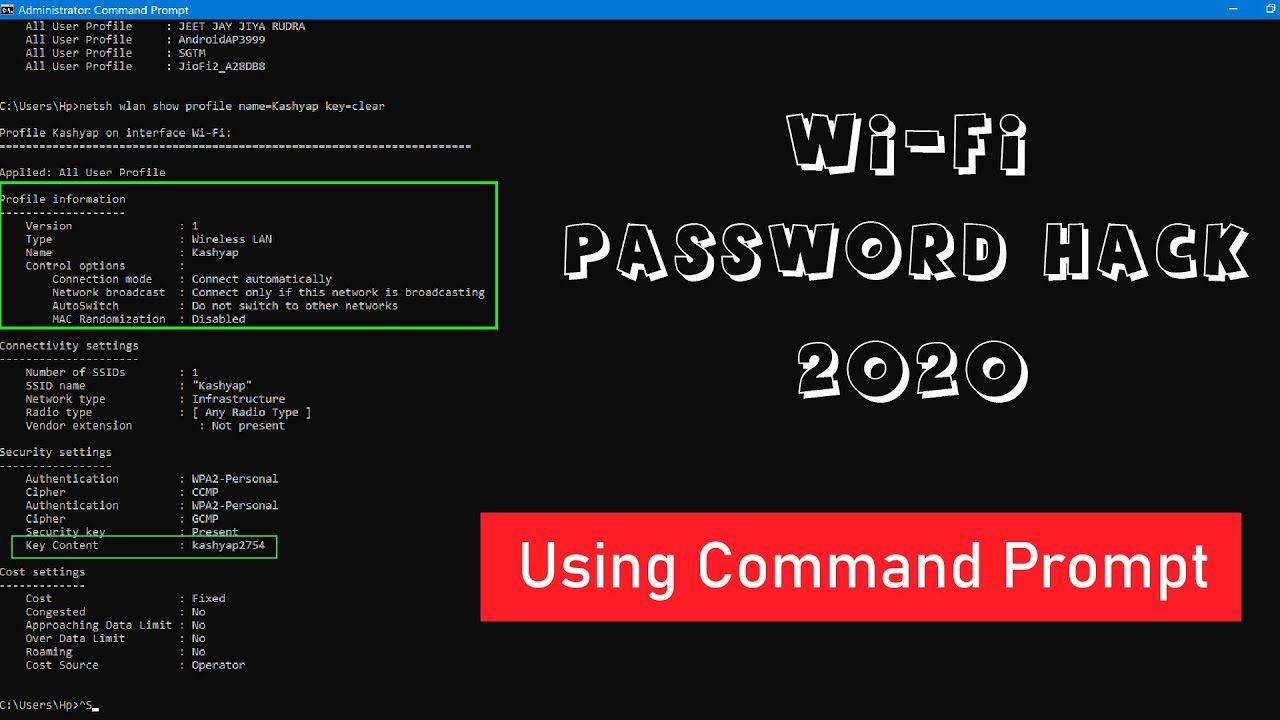
Type and search [Command Prompt] in the Windows search bar ①, then click [Open]②. In the Command Prompt window, type the command [Netsh wlan show profile name="Wi-F name" key=clear]③, and then press Enter key. For example: Netsh wlan show profile name="ASUS" key=clear, ASUS is a Wi-Fi name that has been connected currently. Connect to Wi-Fi using CMD A Wi-Fi adapter eases the process of connecting your Windows 10 laptop or desktop to the network and internet without dealing with cables. However, it's only. Select Run as administrator, and the netsh command prompt will open. To start managing Wi-Fi settings, you'll want to get a clear view of the wireless profiles in Windows. To do this, run the following netsh command to show the wireless network profiles. wlan show profiles. If you're using the command prompt, run the following command. 1. View Wireless Network Profile By default, Windows keeps track of the wireless network names and passwords of all the WLAN profiles used on your computer. With a single command, you can view the list of all wireless network profiles stored on your computer. Right-click on the Start menu and click "Run" from the list of options.

How To Connect WiFi Network Using Prompt] in Windows 10
You can also connect, manage, and delete your WiFi networks using the command prompt. In fact, the command prompt offers many more features than the standard network connection settings in Windows 10. Also Read- A-Z Windows CMD Commands List You can use the Netsh WLAN command in command prompt, Windows PowerShell and Windows Terminal. It's however important that you run it with elevated permissions. To do this for Windows PowerShell for example: Right-click on Start (or press Windows key + X) Choose Windows PowerShell (admin) Click Yes on the UAC prompt.
1. How to check the internet connection in CMD To check whether your internet connection works, you can use Command Prompt to test the connection to a particular website or internet location. To do that, you can use the ping network command, followed by a web address or IP address. Step 1. Open elevated Command Prompt. You can press Windows + R, type cmd, and press Ctrl + Shift + Enter to run Command Prompt as administrator. Step 2. Show all stored available network profiles. Next you can type this command netsh wlan show profile in CMD window, and hit Enter. This command can list all the WiFi network profiles that you.
Command Prompt How to Show WIFi Password Windows 10/8/7
Step 1. Open elevated Command Prompt. To do so, you can type cmd in the Search box, and then right-click the Command Prompt app and select Run as administrator. Then click on Yes in the UAC window. Step 2. In the elevated Command Prompt window, type the following command and hit Enter. Step 2: List All WiFi Profiles. Type in the Command Once you've opened the Command Prompt or Terminal, type in the following command: netsh wlan show profile (s) Advertisement - Continue reading below. This command will display a list of all the WiFi networks you've connected to on your computer as seen in the above screenshot.
