How to Draw Ears: Step by Step Circle Line Art School 2.54M subscribers Subscribe Subscribed 5.9K Share 703K views 6 years ago How to Draw People Learn a simple way to draw ears in. 1 Sketch two circles, a large one and a small one. Place the large circle above the small one as shown, leaving some space between them ( At least 2 inches). 2 Draw two lines connecting the circles. These shapes serve to give the ear a basic structure. This is probably the most essential stage of the process, so make sure your lines are up to par.

How to Draw an Ear Really Easy Drawing Tutorial Drawing tutorial easy, How to draw an ear
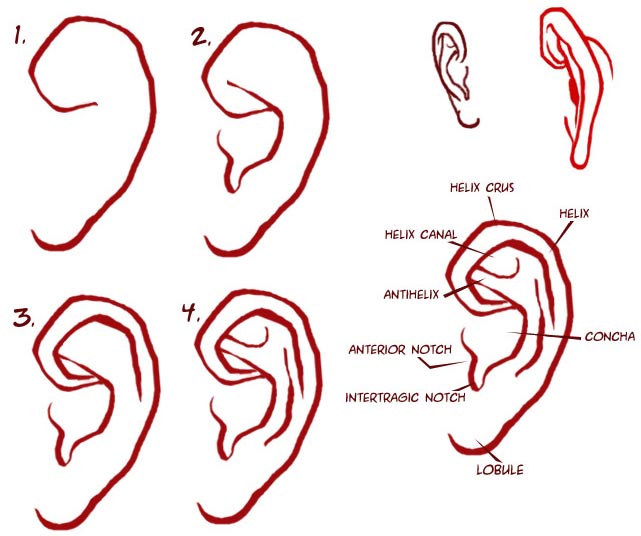
1. Create the basic outline. Sketch a curve like a C that follows the outer rim, from the top of the ear to where it curls in at the ear lobe. Keep it simple and don't worry if you don't get the perfect curved line right away. "Everything is based on a shape," says Wolek. "When I draw an ear, I think of it as a small, flat bowl. To draw an ear, first, break down the form of an ear into basic anatomical features, then create a proportionate structure, then starting with the outline of the helix, begin to place features, and draw in the anti-helix, the tragus, and anti-tragus sections. Two step approach for drawing the ear Step 2: Draw the bumps and folds. Draw 2 curves to indicate the main folds within the ear. The first curve should line the middle to top part of the ear. You can make this curve as smooth or jagged as you want. Remember to leave a small amount of room around the edge. The left side of the curve should curl slightly into the center of the ear. How to Draw Ears : Step by Step - Front, Side and Back viewlearn a very simple way to draw realistic era in diffrent angles Tools usedArtline pencilMechanica.

Learn How to Draw Ears and How to Shade Them Drawing and Shading Ears Tutorial How to Draw
Step 2: Using a Pen to Add Shading to Your Human Ear Drawing. By now, your ear drawing should be looking satisfactory and you should be ready to begin adding some pen to define your ear sketch. Using your ballpoint pen, you can start shading the darkest areas of your ear drawing. Focus on the inner ear. by DonCorgi Drawing ears is a necessary skill to help you create more realistic, expressive, and engaging expressions and drawings. In this article, we will guide you step by step through drawing ears, from the basic shape and structure to the fine details and nuances that make each ear so unique. Step 1. Start by drawing the outer shape of the ear, pay attention to how the ear usually appears wider towards the top half and then get thinner towards the bottom. The top is almost like the roof of a house. Step 2. Start the ear drawing by making a simple construction line sketch that will basically outline the ear. The goal is to get the general flow of it's shape as well as the major proportions such as the height and width. Step 2 - Make a Construction Line Drawing of the Inner Shape Ear front view construction drawing

How to Draw Ears, a Detailed StepbyStep Guide GVAAT'S How to draw ears, Drawings
1. Begin by drawing a long, curved line, resembling a backwards letter "C." This outlines the shape of the ear. Easy Ear Drawing - Step 2 2. Draw a short, curved line along the side of the ear. This helps to shape the earlobe. Easy Ear Drawing - Step 3 3. Erase the guide line from the earlobe. Step 1 For the first step in this guide on how to draw an ear, we will start fairly simple. Using the reference picture as a guide, we shall start by drawing a curvy vertical line. This will form the outer edge of the ear, and once you have it drawn we can move on to the next part! Step 2 - Add more to the edge of the ear
Step 1: With the help of a ruler draw a geometrical pentagon image as shown below. Then at the left corner draw a slight curve to give it a round shape, then on the right side of the pentagon again draw the curve to form a round shape of the ear. Step 2: Under the upper semi curve drawn draw another curve similar to it as shown in the image. Step 1: Start with a sweet potato-like shape We're going to start with a shape reminiscent of a sweet potato. Wider at the top and thinner at the bottom with no sharp edges. Do not close the shape all the way, leave a gap on the left! These first two ear sketches in step 1 and step 2 are important to help you create a simple ear drawing.
How to Draw Ears Step by Step Guide How to Draw
Step 1 - Outline the Ear's Shape Ear outline drawing Begin by making an outline of the ears overall shape. Draw this wider at the top and narrower at the bottom. Leave the outline open at the area where the ear connects to the head. Step 2 - Draw the Curve of the Rim Ear rim drawing Step 1 - Create the Guides of your Ear. Let's get started by creating guides for our ear illustration. We would recommend that you use an erasable sketch medium, such as graphite pencils, in this step. Sketch a vertical rectangle for the max height and width as a guide for your drawing. Next, draw lines on the four corners of your rectangle.
