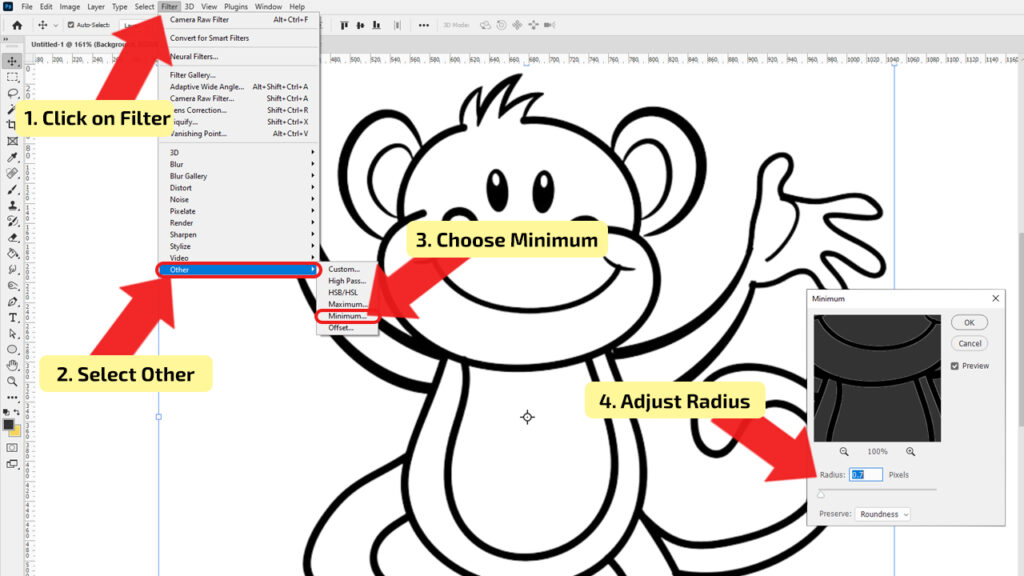
Step 2: Edit the line (s). To make lines ticker, you are going to use the "Stroke" panel. To access this settings window, go to the main menu, choose the "Edit", in the drop-down menu, select the "Stroke" and the window will pop up. The first thing that you will set up in the new window is the "Width" of the line. To make a drawn line thicker in Photoshop, first, select the line by selecting the Quick Selection Tool (W) and choosing "Select Subject" in the Options Bar. Then go to Select > Modify > Expand and expand your selection by 1-5 pixels. Now fill the selection with your line color to thicken the lines. This is just one of a couple of different.

How to Make Lines Thicker in — The 3 Best Methods
Learn four ways to change the thickness of existing lines in Photoshop to modify the look of drawings and line art with ease. This tutorial will cover 2 ways. Download Article. 1. Select the lines that you have separated from the background. The easiest way is to use the "Channels" palette and get your selection from there. 2. Go back to the line art layer and then add a "Levels Adjustment" layer. 3. Move the black slider (black triangle on the left) to the right. Make thicker & thinner lines on your line art images in Photoshop.Learn how to thicken thin lines and make thick lines thinner in Photoshop so you don't have. Step 2: Set the Stroke. With the selection active, we'll select the Stroke command to easily thicken the lines. Go to Edit and choose Stroke from the menu. The panel that opens allows you to choose how you would like to thicken the lines. Choose the width of the lines in pixels.
Make lines thicker & thinner in Quick fix for line art
To to make the line, use the line tool to make a shape and set the thickness using weight (here I've made it 60px): To go back to that shape layer later and readjust the line thickness, adjust the height value (here I've changed it to 30px) No distortion - just the line thickness has changed. Dave. Upvote. Step 5. Go to the "Edit" menu and select "Stroke." Enter the number of pixels by which you want to increase the line. Set the color, if not black, by clicking on the color box. If you are thickening a colored line, bring the cursor over the image to activate the color selection tool and click on the color you want to copy from the image. Learn a quick and easy way to make lines thicker and wider in Photoshop. This is a handy way to avoid having to redraw your line art and make all the lines i. How To Make Lines Thicker and Thinner in Photoshop | Line Arts | Under 2 minutes.Thanks for watching, let me know what you think in the comments section! #ph.
How to Make Lines Thicker in — The 3 Best Methods
Photoshop CC Thicken Lines on Scanned Art - Make Edges WiderLearn a way to make lines on your line art wider in Photoshop. This process will allow you to thi. Subscribe Now:http://www.youtube.com/subscription_center?add_user=ehowtechWatch More:http://www.youtube.com/ehowtechSetting line thickness in Photoshop can h.
1. In Photoshop: Select the area that you want, and make it grow to be thicker. Looks like the best select option is Color Range. Go to tab Select > Color Range. This will open the Color Range dialog box. Click anywhere on the area you wish to select, In this case the pink outline. Now the outline is selected. When using the Line Tool in Photoshop CS2 you do have an option to change the line thickness or weight but when I click on the Rectangle Tool that option for changing the the line thickness or weight disappears.. use the stroke option. You can even set layer styles to be applied to objects in one click. So if you commonly need the thick.
How to Make Lines Thicker in — The 3 Best Methods
Set Size, Location, Blending Mode, Opacity, and Color > OK. Or, select Horizontal Type Mask Tool > enter text > Command (macOS) or Control (Windows) > hold key to adjust text or object. Then, switch to Move Tool and add an outline (stroke) to the selection. This article explains how to create a thick outline in Photoshop 6 or later without. The selection will turn into the layer's mask. 4-alt+click the mask to see the black and white value. 5-use levels to bring up the white values. 6-duplicate the layer and THEN use maximum on the mask to get the thickness desired.
