STEP 3: ATTACH 1x2s to PLYWOOD. Apply wood glue to the front of your plywood shelf and then clamp a 1×2 so that the top is flush with the top of your plywood. Add a few nails to hold the 1×2 in place. Wipe off any wood glue that seeped out. Remove the clamps and repeat with your remaining shelves. Building a diy plywood shelves is an excellent way to add functional storage space to your home. Discover 25 free DIY plywood bookshelf plans to create your own stylish and functional DIY plywood shelves with step-by-step instructions.

Our amazing bespoke plywood storage made by the wonderful barnesandgoldman. Plywood Storage
These DIY storage shelves are simple to build with 2x4 lumber and plywood! Download the free woodworking plans and make your own today. Our backyard shed has become a dumping ground! It's gotten so full of random stuff, I couldn't get our bikes out without rearranging the mess. How To Build Floating Shelves Updated: Jun. 02, 2023 Customize these amazing floating shelves to suit any room in your house! Next Project You can buy floating shelves in stores or online for $20 to $80 each. But before you do that, consider building your own. For about the same cost, you can get the exact size, thickness and look you want. A: Sanded smooth, paintable with minimal preparation. There may be minor repairs or seams visible, though finding "perfect" isn't terribly difficult. B: Solid surface with some repairs- generally patches shaped like footballs. May have some splits or tight knots up to 1 inch (though no chunks of wood missing) . For this bookshelf, you will need: (1) ¾″ full sheet of plywood (you will have some leftover) (2) 2x2x8 boards ½ sheet ¼″ plywood (optional) 1 ¼″ pocket hole screws 2 ½″ pocket hole screws 1 ¼″ wood screws 2″ wood screws Edge banding (optional) Kreg pocket hole jig Kreg Rip Cut Kreg Accu-Cut Miter Saw Circular Saw Drill Kreg shelf pin jig
DIY 2x4 Shelving Unit Sweet Pea
1. Start off by planning the layout of your shelves. This is probably the most important part, so don't rush it! There's lots of ways to do this, but my preferred method is to make a scaled-down sketch. I started off by carefully measuring the space I wanted to fill, then scaled down the measurements (so 10cm in real life equated to 1cm on paper). STEP 1: Plan your shelves. Assess the alcove and determine how many shelves you want to add. Consider what you'd like to put on the shelves, and make sure there is enough spacing between each. DIY All Plywood Floating Shelves with NO BRACKETS // Woodworking with Kreg ACS Modern Builds 1.76M subscribers Subscribe Subscribed 1 2 3 4 5 6 7 8 9 0 1 2 3 4 5 6 7 8 9 0 1 2 3 4 5 6 7 8 9.. In this video I make a set of BirchPly shelves using only a simple toolset - an entry-level plunge saw, a drill/driver and a set of cheap chisels. Enjoy!++++.

45 best images about Shelves Floating on Pinterest Cool lighting, Sheet of plywood and Window
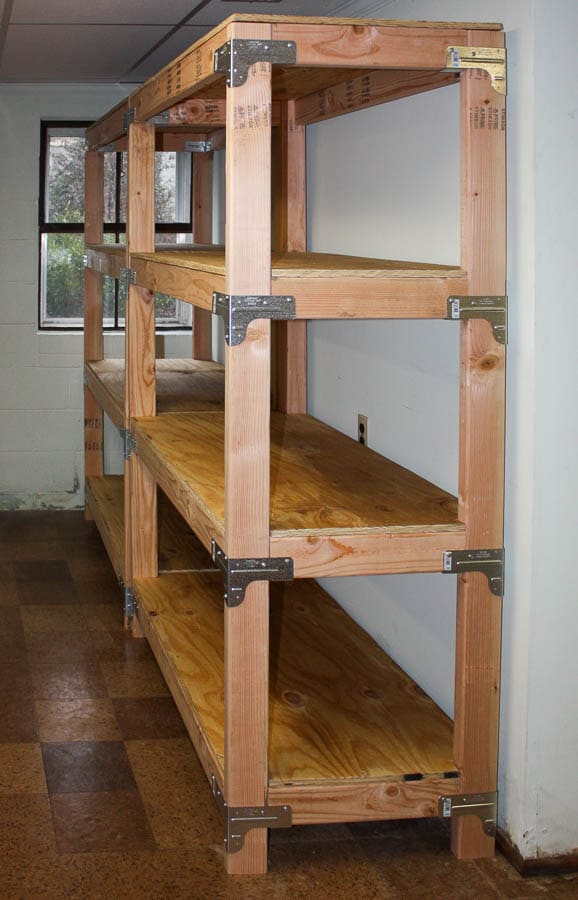
Step 1: Design and Limitations Each shelf section is made up of three elements: 2x4 frames, 2x4 shelf support boards and 3/8" plywood shelf toppers. The 2x4s boards all sit vertically, their strongest orientation. Pocket-hole screws hold the 2x4s together, while 1" drywall screws hold the plywood to the 2x4s. To build a basic shelf, place 2 bricks at each end of a softwood or plywood board on the floor. Then, place the board on top of the base bricks. If you'd rather attach your shelving to the wall, position a bracket on the wall where you want the shelf to go, mark it with a pencil, and drill holes in the wall.
You can simply lift up the shelf and remove it to make space for taller items. Construction Process: For this project I used the Kreg Accu-Cut guide track to rip and cut plywood shelves. The Kreg Accu-Cut is a great tool and works in place of a table saw: rip and cut plywood (up to 48″ long) Detailed info for this DIY Plywood shelving system and our smart home experiments is coming soon to HOmeMade-Modern.comfollow us on instagram for project upd.

plywood shelving unit Google Search Home library design, Bookshelves diy, Plywood shelves
$51-100 Introduction Organize the clutter. These simple box shelves can hold books, hats, shoes and all kinds of knick-knacks. You can even sit on them! Tools Required Air compressor Brad nail gun Circular saw Cordless drill Drill bit set Framing square Level One-handed bar clamps Paint roller Paintbrush Putty knife Router Safety glasses Sand the edges for a smooth finish. 4. Locate the studs: Using a stud finder, identify and mark the positions of the studs in the wall where you will anchor your shelves. 5. Mount the brackets or supports: Align your brackets with the marked stud positions. Use a level to ensure they are straight, then mark the drill holes.
