Strategically Place Individual Lash Extensions: Before the classic lash mapping process, carefully consider key factors such as lash length, curl, and precise placement of individual extensions. The strategic application of lash extensions ensures a customized and natural-looking result that seamlessly blends with the client's existing lashes. Lash mapping is the process of creating a map or blueprint of where you will place eyelash extensions on a client's lash line. This is done by looking at the shape of the eye and natural eyelashes and then planning out which lengths, curls, and thicknesses of lashes will go where. Why Is Lash Mapping Important?

Wispy Lash Mapping As a beginner lash artist you might be asking
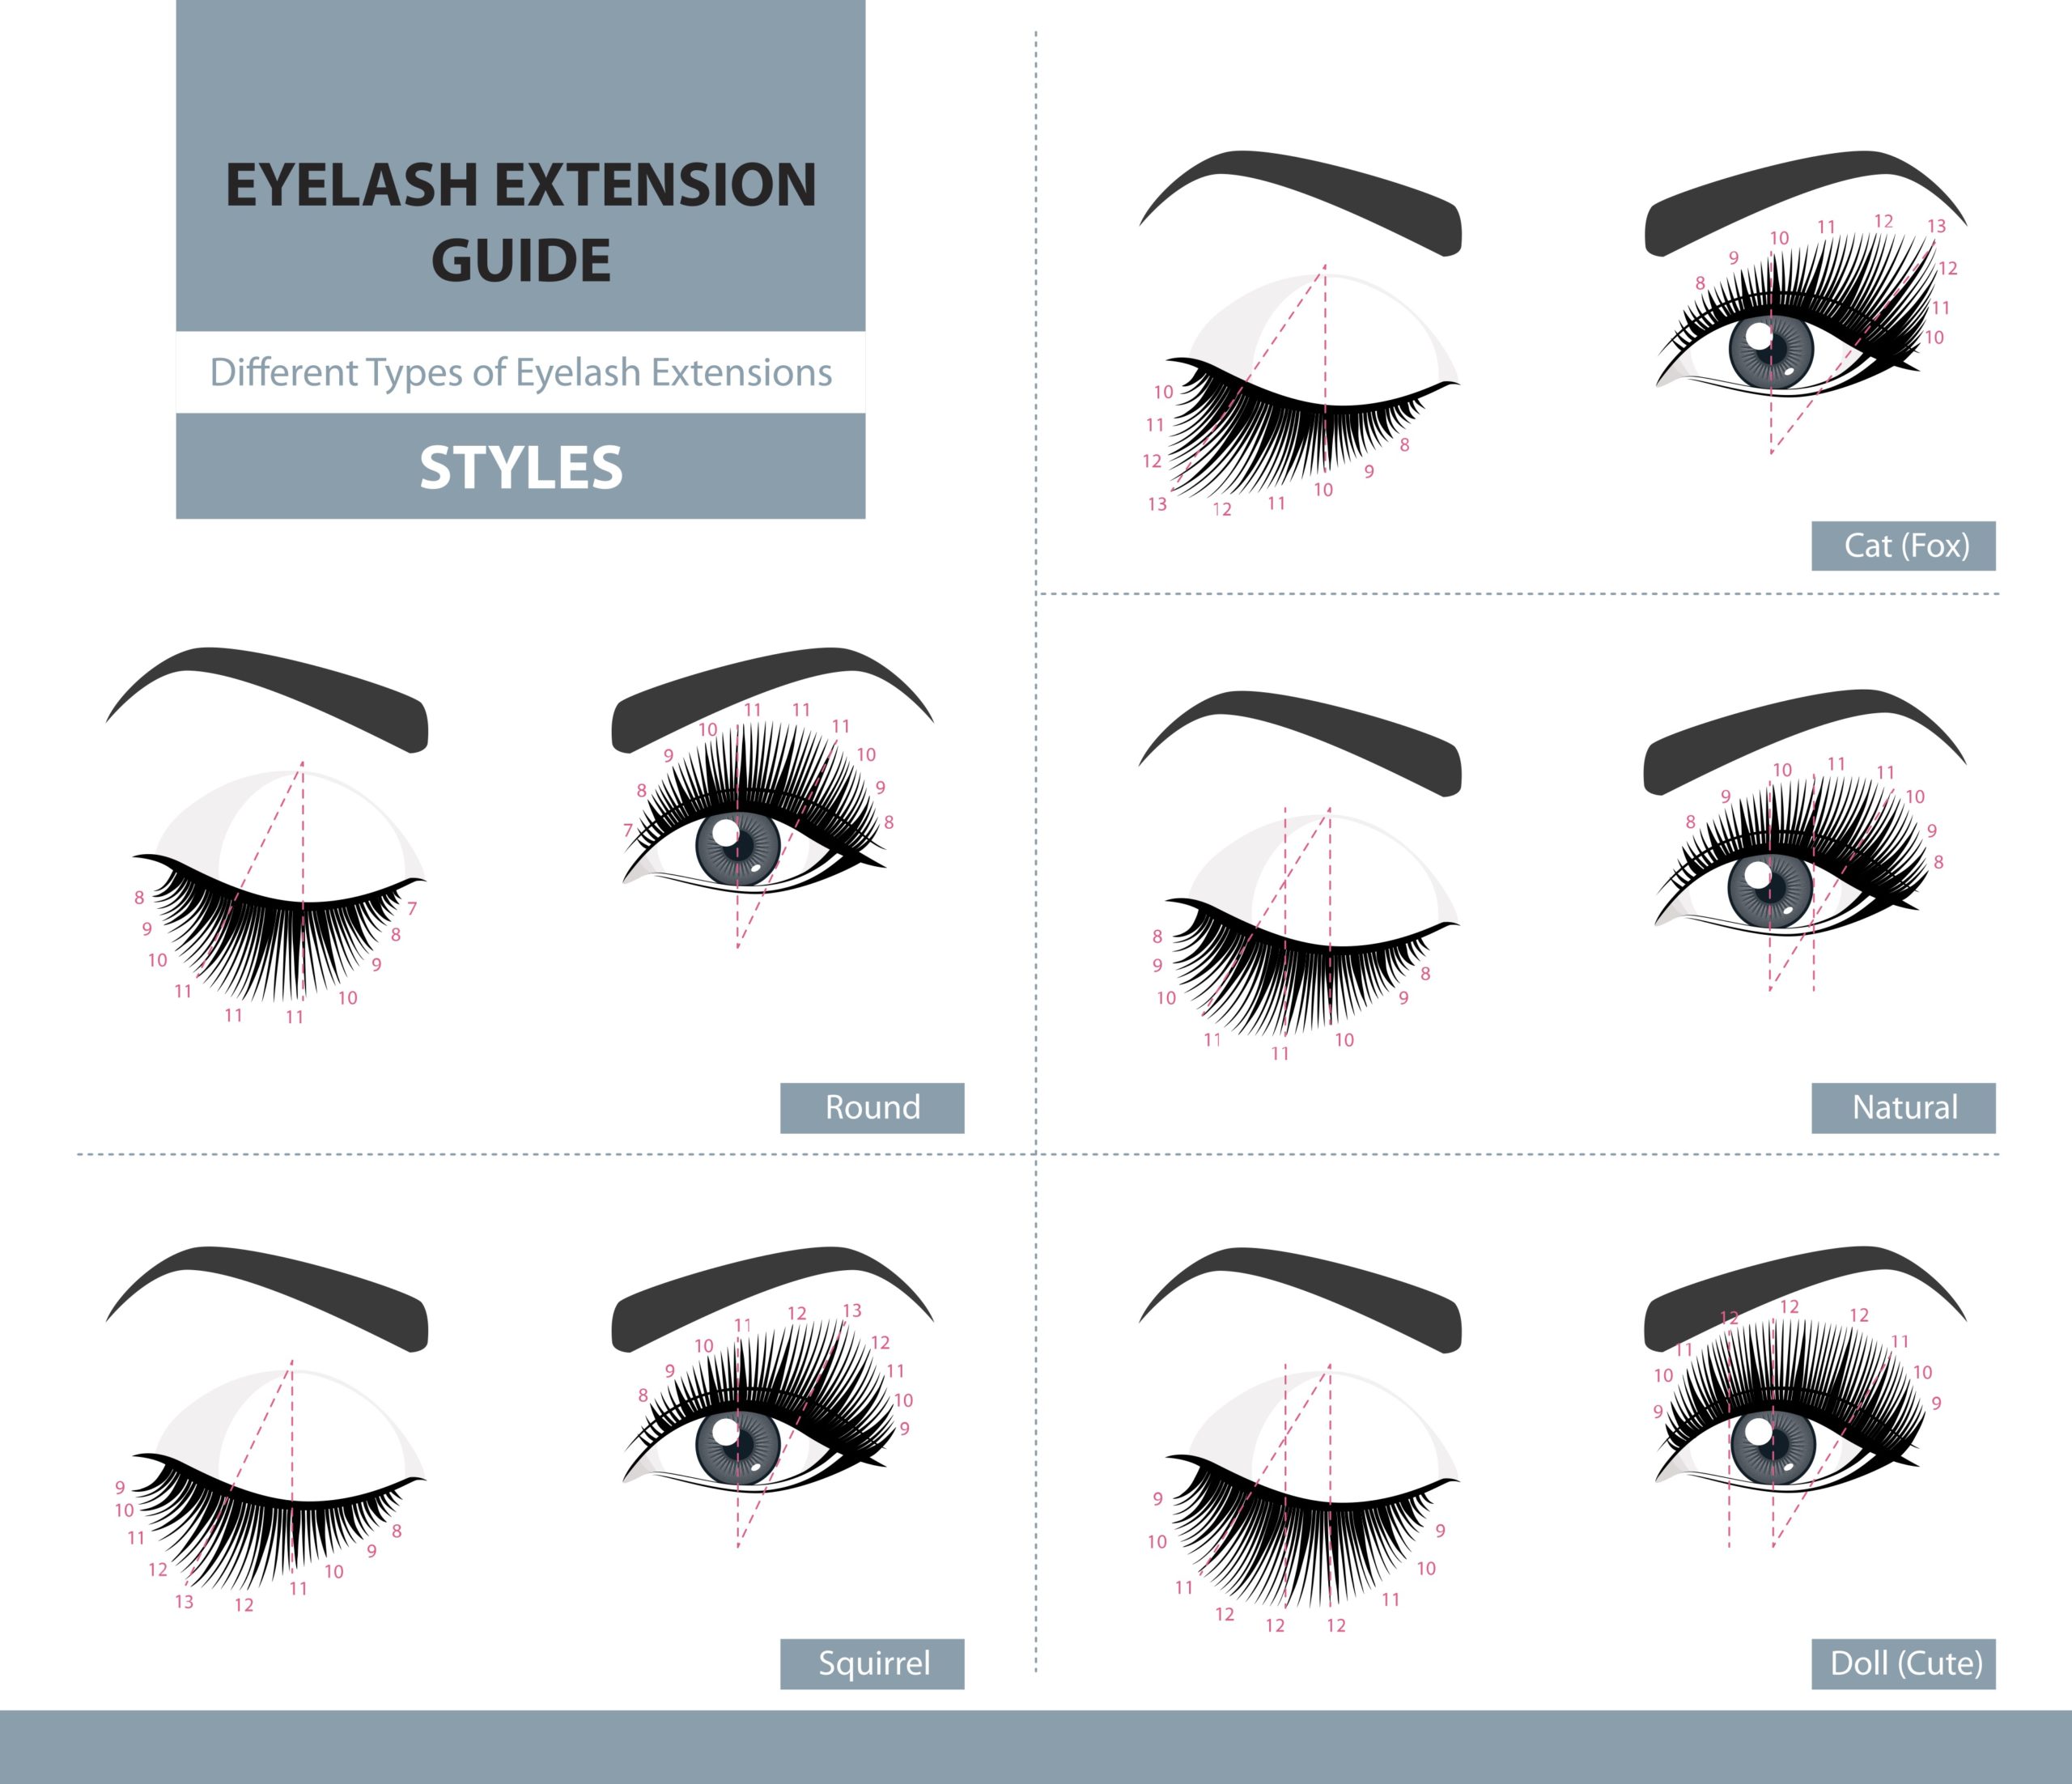
Lash mapping is a technique for planning which lengths, curls and thicknesses you will use where, in order to create a fabulous set of eyelash extensions with the style and the level of drama that your client desires - and that is also suited to their eye shape and natural eyelashes. Lash mapping is the technique we use to plan which length, curl level, and thickness you'll use in each area to create a dramatic, stylish look. Explore our lash mapping guide today to learn about this essential part of extension application. Your Tools To ensure proper lash mapping, you'll need a few tools, including: Eyeliner Gel pads Lash mapping is a technique for planning which lengths, curls, and thicknesses you will use where, in order to create a fabulous set of eyelash extensions with the style and the level of drama that your client desires, but that is also suited to their eye shape and natural eyelashes. Download our free Lash Mapping Guide ! Isolation Technique: Using Precision Tweezers, isolate one natural lash at a time to prevent lashes from sticking together. Make sure you are isolating 1 single lash, and there are no baby lashes hidden behind.

Pin on Eyelash Extensions
Sounds like a tall order, doesn't it? Don't worry! If you don't know anything about lash mapping, we'll take you through the basic information about lash mapping — creating a lash map, choosing popular lash maps, and knowing important tips when mapping eyelash extensions. Table of Contents [ hide] 1 What Is a Lash Map? 1 Purchase a set of gel pads meant specifically for eyelash mapping. Have your client lay down and close their eyes. Place the pad right under their eyes, in the lower lash area. If you are not confident in your abilities, use a mannequin head instead; make sure that it has lashes. A Comprehensive Guide To Lash Mapping As a beginner lash artist, you might ask yourself many questions about mapping. What is lash mapping? How do you map eyelashes? Why is lash mapping is essential? Can you mix C and D curls?! Think of lash mapping as making a plan for eyelash extensions. Classic lash mapping 2.2. Cat-eye lash mapping 2.3. Doll-eye lash mapping 2.4. Kitten lash mapping 2.5. Kim-K lash mapping 2.6. Squirrel lash mapping 2.7. Dramatic lash mapping 3. How to determine the eye shape to choose lash mapping? 4. Further recommendations for lash mapping 1. What is lash mapping?

Cat eye lash map Eyelash extensions, Eyelash extentions, Cat eye lash
Free Lash Mapping Guide Using lash maps helps you create perfect symmetry between the eyes when applying eyelash extensions. There are different maps to suit different eye shapes and preferences. After consulting with your client, pick your preferred lash map and length, and draw it on the under-eye pad. • Step 1: Begin by examining the eye shape of your client. Make sure to note any asymmetries that may be present as these can help you better determine which styles would work best. • Step 2: Measure out the length and thickness of their natural lashes so you can create a map accordingly.
Lash Mapping is a great technique to use, as it allows you to create a look that is completely bespoke to your client. What you'll need for lash mapping: So what do you need for lash mapping? This bit is the easy part, you'll just need some eye pads and a pen! Step 3: Apply Adhesive. Dip the base of the lash extension in a small amount of lash adhesive. Ensure the extension is lightly coated but not dripping with adhesive. Carefully attach the extension to the natural lash, about 1-2 millimeters away from the eyelid. Do not touch the skin with the adhesive.
Lash Mapping, where to start… The Beauty Academy
Step-By-Step Method For Lash Mapping Eyelash extensions are one of the most expensive semi-permanent makeup tools. It's well-priced for all the customized work that goes into it. We get to create a style that's perfect for the client based on their eye shape and the curl, length, and thickness of eyelashes. Lash Mapping guides. These include every lash map you will ever need. Allowing you to cater for every client you meet. The simple yet effective way to map every client. Simply peel off, apply over your eye pads and start creating styles. 336 pairs of lash maps - Bumper pack 14 different lash mapping styles 24 pairs of pads per page (per design) Lash mapping made easy Classic and Volume lash.
