Get High Quality Radiators At Low Prices This Month - 10% Off Everything. Buy Now! Huge Savings Available This Month. High Quality Radiators At Great Prices Make Your Fireplace More Efficient! DIY Heat Exchanger - YouTube © 2024 Google LLC Check out my website for other awesome content! https://jasonoid.com/A normal fireplace loses 90% of it's.

Efficiency of fireplace blowers and fans New Fireplaces Trends
217 Share 27K views 5 years ago I built an open fireplace heat exchanger to recover the energy lost up the flue. I had the idea then went on YouTube and was inspired by others who had also. Kristin Hitchcock Last updated: Jul 26 2023 Heat exchangers are used for heating and cooling and can be used for ventilation in a home. Some homeowners use basic heat exchangers to heat their garages. However, DIY plans for heat exchangers are few and far between. They are not ordinary DIY projects, after all. 1) Cut your wood so it is all 6 Inches wide. - We will then cut it to match the length of each side of the fan. 2) Measure the sides of the Fan 3) Cut the wood to match the lenghts of the fan. - Should have 4 pieces in the end. asquaregarden 1.61K subscribers Subscribe Subscribed 16K views 2 years ago Wood burning fireplaces are extremely inefficient as most of the heat goes out the chimney. One way to mitigate some of.
The urge for less energy use DIY heat exchanger for your shower
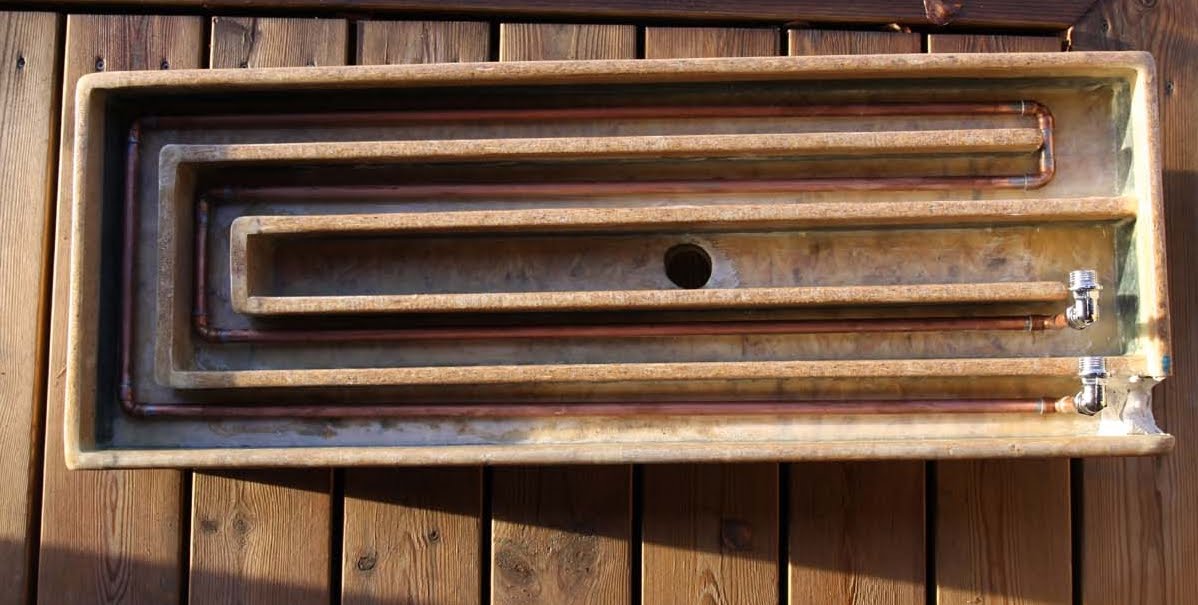
Set up Place four fire bricks in the fireplace and set the heat exchanger on top. Elevating the heat exchanger will improve air flow in the fireplace. It's now ready for the fire. Build the fire inside the heat exchanger's "C" area. Coals Are Your Goal. "You want to build a coal base, which generates heat and drives it upward," says Hite. Start the fire with small pieces, Hite says. Then as the fire gets going, add pieces at least an inch thick. These make coals that put off a lot of heat. Adding even larger pieces after that increases the coal base and the heat output. Step 1 - Plan There are some basic principles that you need to keep in mind when planning your fireplace blower grate. The exhaust tubing should be higher than the inlet tubing because warm air rises higher than cold air. This is a key design feature; so do not forget to incorporate this basic design principle into your fireplace grate heater. 1 -Can of High Temp Stove Paint 1-Tube of High-Temp Fireplace Cement Tools I used MIG Welder Bandsaw Chopsaw Bench Grinder Angle Grinder Rotary Tool Tin Snips Various Drill bits 1-3/8 " diameter Knockout Punch Step 2: Preparing the Steel Pipes I used left over pieces of galvanized fence posts and top rail for the steel exchanger pipes.

Wood Burning Fireplace Heat Exchangers Fireplace heat, Wood stove
Over the outside of this he's placed a pair of T pieces joined by a longer length of pipe all of a larger bore, and a mains-powered fan forces air through this air jacket. The result is a. Here are my SketchUp animations and designs for a DIY fireplace heat exchanger. Like my other designs, they use mostly stock materials that can be easily pu.
A DIY option for a fireplace heat exchanger is to install a metal box around the fire. This will help to reflect the heat back into the room, and will also create a barrier between the hot air and the cold air outside. You can find these boxes at most hardware stores, or you can make your own out of sheet metal. #1 Witch Doctor 01, DuxDawg, chelloveck and 5 others like this. Out in the woods off-grid in-the-forest beekeeper In the 1970s my parents bought a house that had a device, much like that, inside its fireplace. It was not threaded black pipe with 90-degree angles, but rather bent tubing.

Wood Burning Fireplace Heat Exchangers Fireplace Ideas
Best Add a Comment tdhftw • 12 yr. ago While more expensive a wood burning stove insert is by far the most efficient way to heat with wood. They have blowers that circulate the hot air out into the room, they are totally enclosed, so they are safer, they control the combustion process far better. The 3×4 rubber flex coupling centers the 3-inch pipe core inside the 4-inch shell so air can flow around the core. 2. Stretch out your aluminum duct to about 7 feet. Attach a 3-foot chunk of 3-inch PVC to one end of the alu (this is your indoor side), and an 18-inch chunk of 3-inch to the other end of the alu.
