A battery isolator is a device that prevents electrical current from flowing between two batteries. Said in another way, it is a device that lets you charge multiple batteries from one alternator. It does this by using a series of diodes that only allow current to flow in one direction. Li-BIM Lithium Battery Isolator Wiring Diagram How to Wire a Li-BIM Lithium Battery Isolator There are 5 studs on the Li-BIM, You'll need to attach a wire to each of them; and here's where they need to go. Wiring the Li-BIM Ign Stud Ign: This stands for 'Ignition' and needs to tap into a circuit that has 12v power when your vehicle is on.

Multi Battery Isolator Wiring Diagram Free Wiring Diagram
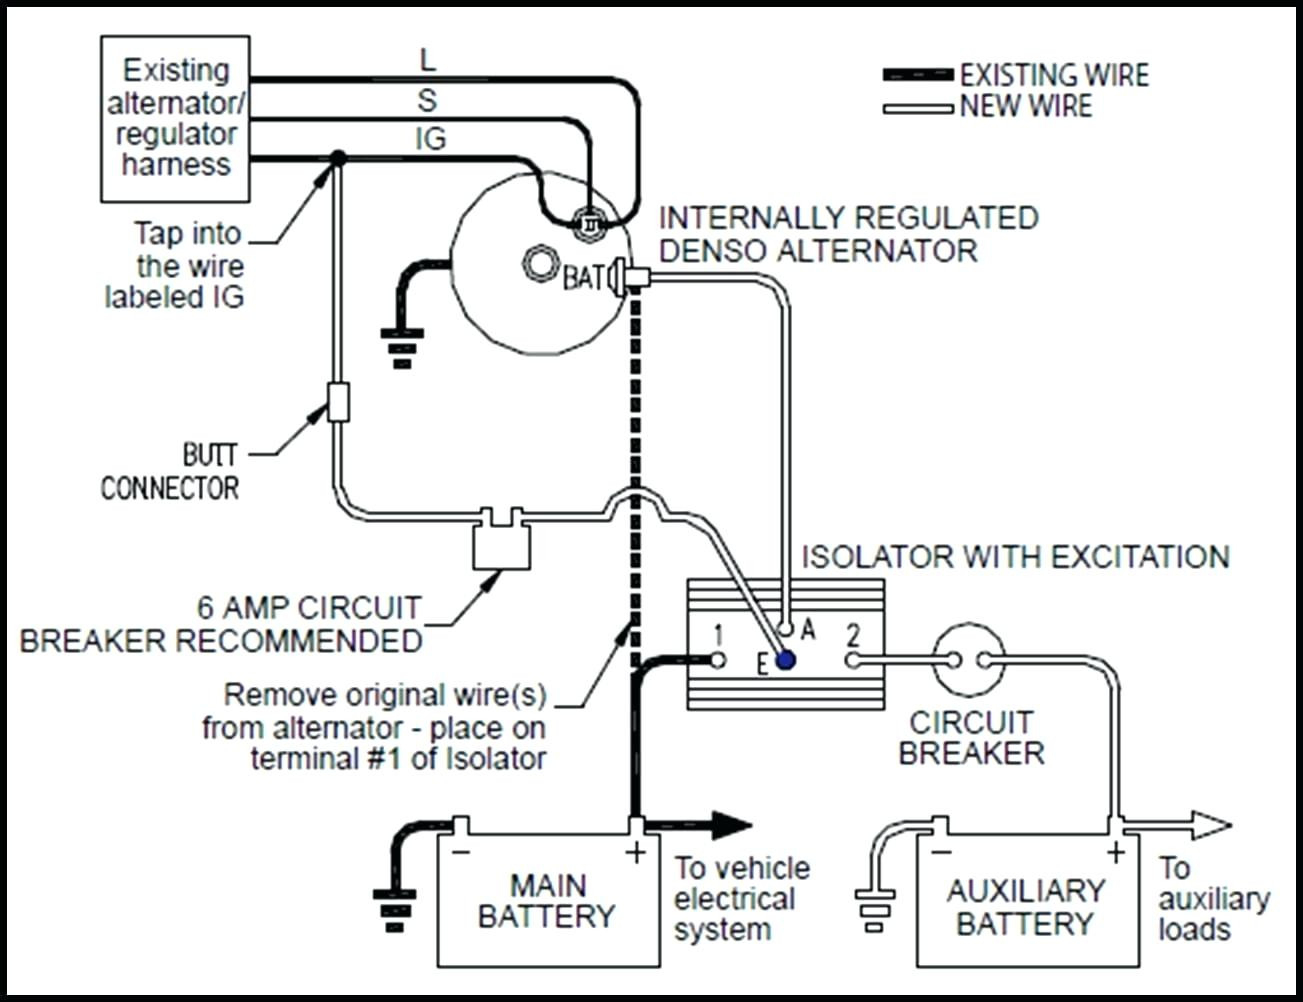
Step by step Battery Isolator install (12V 140 Amp Dual Battery Isolator by KeyLine Chargers - Voltage Sensitive Relay (VSR) Pro Dual Battery Kit). This isolator kit connects the starter. coach battery). Use appropriate heavy gauge cable and proper fusing. 4. Connect black "Ground" wire to ground. 5. Optional circuit connections: • Connect violet "Boost" wire to a normally open momentary switch. Connect the other side of the switch to +12V DC. • Connect white "Status" wire to a 12V DC, 50mA max. audio/visual alarm. (Step-by-Step Guide) by UniEnergy Technologies Battery Do you want to prioritize safety above all when working on various equipment like big vehicles or other electronic devices? Well, one of the best tools to help you out is a battery isolator switch. Wiring diagram for Battery Isolator Question: Not sure what post 1-2-A-and E go to asked by: Mike Helpful Expert Reply: For your battery isolator similar to # DW08771, you will have connection posts for each battery and for an alternator. The main battery will connect to position one and the alternator to the A post.
12V Battery Isolator Wiring Diagram Cadician's Blog
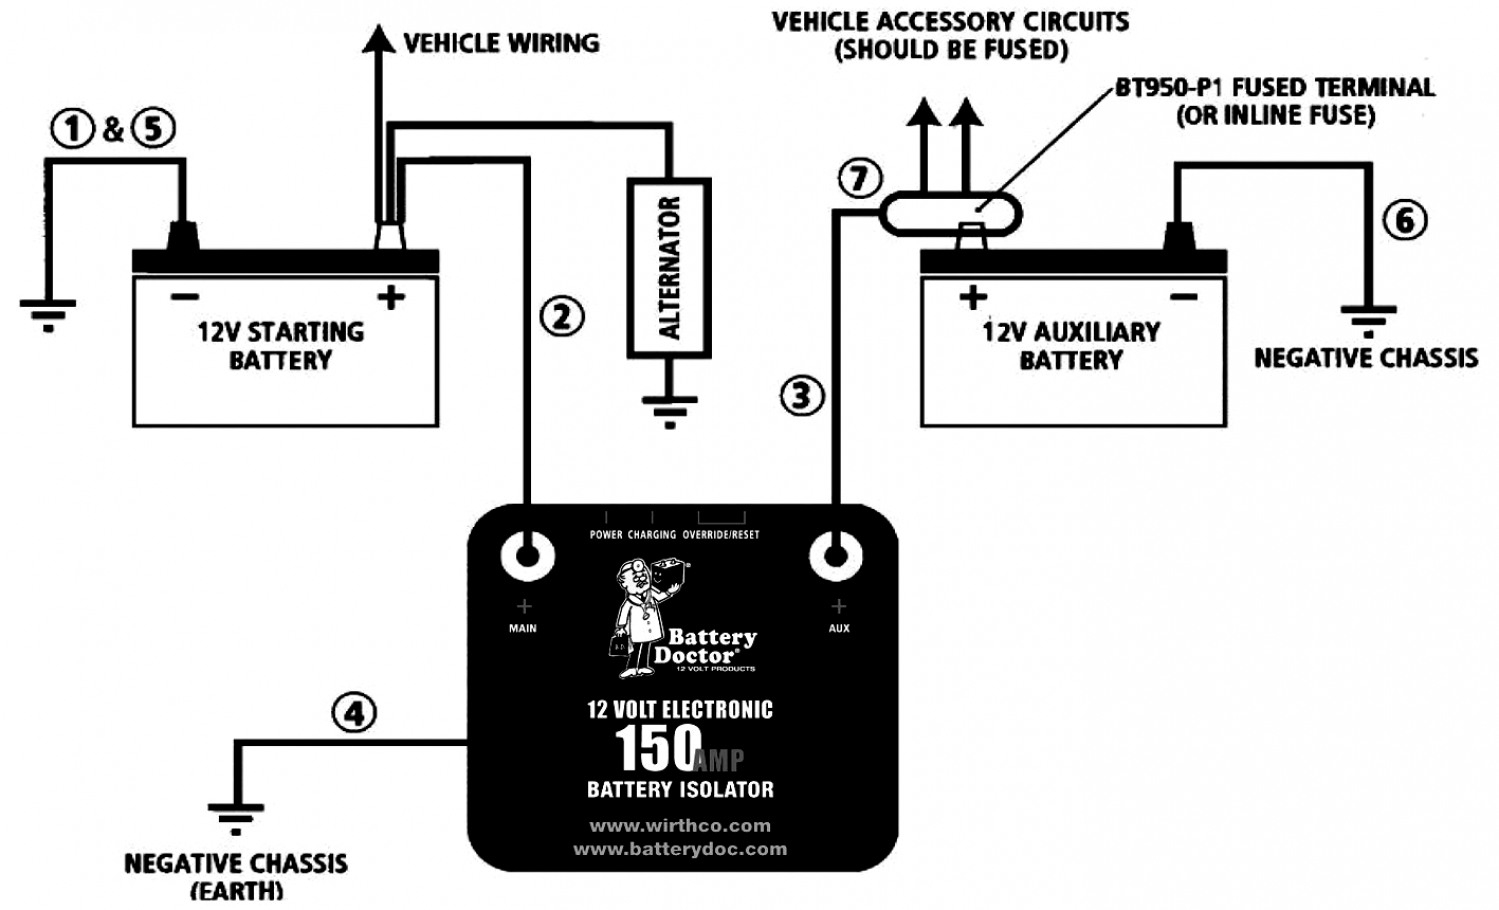
Pros: No need to separate starter/ignition wiring from accessory wiring. Cons: Requires user to manually switch between batteries. Heavy battery cables must be run to the switch. Auxiliary Battery Solenoid 25-50 What You'll Need Whether it is a fuel line replacement or wiring a battery isolator, you can accomplish many seemingly tough jobs on your own. If you find yourself in need of a battery isolator wiring, here are a few tools and materials needed, as well as steps that can help to guide you. Step 1 - Turn Everything Off and Prepare Note: The battery isolator is supplied with a set of wiring hardware. If the hardware packet is lost or missing from the packaging, contact the factory. Using incorrectly sized hardware on the wiring studs will damage the isolator. Stud sizes are as follows: 70 amp models — 6 mm (1.0 pitch) 120 and 165 amp models — 8 mm (1.25 pitch) 1. The battery isolator allows two batteries to be charged at the same time. When the engine is started and the start battery reaches 13.7v, the isolator engages, allowing two battery banks (start and house) to be charged simultaneously. When the voltage drops below 12.8v (eg the engine is stopped), the isolator disengages, separating both batteries.
Sure Power Battery Isolator Wiring Diagram Wiring Diagram
An overview of how to wire a Stinger isolator to run dual batteries in a truck, van, or car. The isolator keeps the main battery from going dead. 200 amp St. Sure Power offers a range of installation wiring kits which make the job a snap. See the table that follows for the recommended wire size and circuit breaker for your installation. For optimum system performance it is recommended that a battery labeled "Deep Cycle" be used in the auxiliary position.
Wiring Diagram Wiring the relay: 1. The black wire coiled inside the relay needs terminated to a good ground location using the included blue crimp connector. This wire is simply used as a ground for activating the relay. 2. One terminal on the relay should be connected to the positive terminal of the primary starting battery using 6ga red wire. The QuadBoss Battery Isolator might seem small, but the impact it could have on your rides is massive. We take you step-by-step through the installation proc.

How To Install A Battery Isolator In Your Conversion Van Parked In
The following basic wiring diagrams show how batteries, battery switches, and Automatic Charging Relays are wired together from a simple single battery / single engine configuration to a two engine, one generator, and four battery bank system. For more detailed wiring guidelines please consult a qualified marine electrician or one of the many. Step-01: Locate the battery on your vehicle and disconnect the negative wire first for safety, then the positive wire. Step-02: Install your auxilary battery next to your starter battery. Each vehicle is different, so the location point is important.
